Additional Setup
Connecting 2-electrode to body
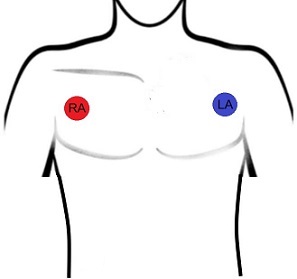
The 2-electrode cable provided by Protocentral contains a standard stereo jack that is to be connected to the breakout board/shield. The cable's other end has snap-on electrodes, which connect to disposable electrodes that are attached to the body as shown in the below figure. For testing purposes, you can use an ECG simulator to provide inputs to the board.
Note
If you have a 3-electrode cable, it can also be used as 2-electrode by simply NOT connecting the RL electrode.
Warning
When connecting the electodes to the body, it is safer to disconnect the mains power source to the Arduino. For example, if you are using the Arduino along with a laptop, disconnecting the battery charger from the laptop would be a safe option.
Connecting 3-electrode to body
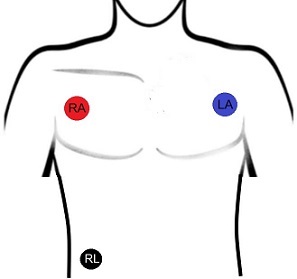
The 3-electrode cable provided by Protocentral contains a standard stereo jack that is to be connected to the breakout board/shield. The cable's other end has snap-on electrodes, which connect to disposable electrodes that are attached to the body as shown in the below figure. For testing purposes, you can use an ECG simulator to provide inputs to the board.
Warning
When connecting the electodes to the body, it is safer to disconnect the mains power source to the Arduino. For example, if you are using the Arduino along with a laptop, disconnecting the battery charger from the laptop would be a safe option.
Connectiong Spo2 probe to finger
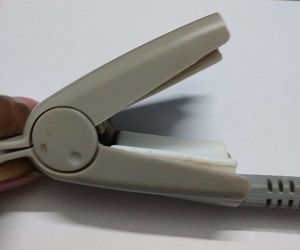
The spo2 probe provided by Protocentral contains a standard DB9 connector that is to be connected to the spo2 probe connector on a breakout board/shield. The other end contains a spo2 probe clip, where the finger needs to be placed.
Follow the below steps while connecting the spo2 probe cable to the body:
-
With the upper and the lower jaw of the Spo2 probe clip open, place the index finger on the base of the clip.
-
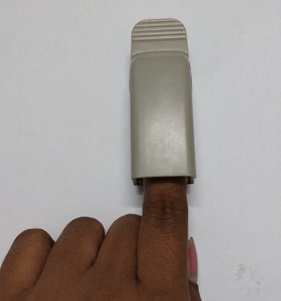
Move the index finger forward, till the finger is above the sensor window. Ensure that the fingertip is against the finger stopper.
-
The sensor should be oriented in such a way that the cable is positioned below the hand.
Note
In case if the index finger is not available or cannot be positioned properly, the smaller fingers can be used instead.
Connecting 3-electrode to body (only for ADS1293)
The 3-electrode cable provided by Protocentral contains a standard stereo jack that is to be connected to the COM1 present on the breakout board/shield. The cable's other end has snap-on electrodes to be connected to simulator. The leads are to be connected in the following manner.
| Electrode cable | Simulator | Connector |
|---|---|---|
| LA | RA | |
| RA | LA | COM1 |
| RL | RL |
Connecting 5-electrode to body (only for ADS1293)
The two 3-electrode cable provided by Protocentral contains a standard stereo jack that is to be connected to the breakout board/shield. The cable's other end has snap-on electrodes to be connected to simulator. The leads are to be connected in the following manner.
Connect one of the 3-electrode cables in the following manner:
| 3-electrode cable | Simulator | Connector |
|---|---|---|
| LA | LA | |
| RA | LL | COM2 |
| RL | V1 |
Connect the other 3-electrode cable in the following manner:
| 3-electrode cable | Simulator | Connector |
|---|---|---|
| LA | RA | |
| RA | LA | COM1 |
| RL | -- |